Showing posts with label EDIMAX DSL Modem Router WiFi. Show all posts

EDIMAX AR-7265WnA

Wireless IEEE802.11 b/g/n ADSL2/2+ Modem Router
  • Complies with ADSL2/2+ standards with downstream and upstream data rate up to 24Mbps and 1Mbps
  • Complies with wireless 802.11n and 802.11b/g standards
  • Increases the wireless speed up to 12 times faster and extends the coverage 6 time further *
  • Includes EZMax multi-languages setup wizard for Internet connection, wireless settings and firmware upgrade
  • Supports WPS configuration button
  • Supports WMM, UPnP, SNMP, DHCP, IP/MAC filter, DMZ and virtual server
  • Wireless-N ADSL2/2+ Modem Router
Edimax AR-7265WnA is a high performance router that provides a full rate of ADSL2+ standard with the superb reliability and a cost-effective solution for home and small business. This modem router complies with 802.11n, the next generation wireless standard. With the advanced MIMO technology, it provides up to 12 times better data transmission rate (up to 300Mbps) and 6 times better coverage than a standard 802.11g/b router.

Wi-Fi Protected Setup (WPS)
Press the WPS button to activate the wireless protection. One-Click WPS button helps you to setup a secure wireless network in a minute .

Built-in ADSL2/2+ Modem and lP Sharing
You can share the ADSL broadband connection to all wired and wireless network users (up to 253 users) whilst benefit from any ADSL, ADSL2 or ADSL2+ Internet connection, with up to 24Mbps Downstream and 1Mbps Upstream.

Multi-languages Setup Wizard *
A unique Multi-languages Setup Wizard is provided in the product CD. You can select your mother-tongue and follow the simple steps to connect to the Internet .

EDIMAX AR-7084A

Fast Ethernet ADSL Modem Router

Built-in High Performance ADSL2/2+ Modem

The AR-7084A is ADSL router runs at speeds up to 24Mbps downstream and 1Mbps upstream, providing higher data rates than traditional ADSL systems. Also, it is backward compatible with existing ADSL services and interoperable with legacy equipment. The ADSL router supports ADSL standard: G.992.1 (G.dmt), G.992.2 (G.lite), G.992.3 (ADSL2), G.992.4 (splitter less ADSL2), G.992.5 (ADSL2+) for Annex A, B. (Annex A and B are supported in different H/W platform)


Easy Setup with EZMax Multi-language Installation CD *

A unique 16-languages setup wizard is included in the installation CD for you to setup Internet connection, router password and firmware upgrade. You can setup the router connecting to the Internet within minutes by following the simple animated steps.

Virtual Server / DMZ

The ADSL router supports 8 Public IP Address mapping so you can set up multi servers (Web server, Mail Server and IP camera...) inside your network for Internet users to access.

Firewall

AR-7084A provides Firewall to protect you from the following Internet attacks, SYN Flooding, Ping of Death, Teardrop and Land Attack. You can restrict users to access the services like Web, Telnet, Ping, FTP and SNMP. Also, you can also block some IP addresses to access Internet thought AR-7084A to increase the security.

Web Configuration

The router can be configured through the friendly Web interface with a Web browser from Internet or Intranet.

IP SHARING

The NAT/NAPT function lets you share the broadband connection to all the network users (up to 253 users).

* The EZMax Setup CD Wizard only supports Edimax router.

Hardware Installation Tutorial Guide. Click here
Streamyx DSL Broadband Internet Connection Quick Start. Click here

FEATURES AND TECHNICAL SPECIFICATIONS

HARDWARE INTERFACE
1 x RJ-11 10/100Mbps WAN Port
4 x RJ-45 10/100Mbps Ethernet LAN Ports
LED Indicators: Power, WAN, LNK/ACT for LAN
Reset Button
MANAGEMENT
Supports Remote Management
System Status and Security Log (Web Interface)
Firmware Upgradeable
POWER ADAPTER
DC 12V, 0.5A
WAN
ADSL Standard:
G.992.1 (G.dmt), G.992.2 (G.lite), G.992.3 (ADSL2), G.992.4 (splitterless ADSL2), G.992.5 (ADSL2+) for Annex A, B
INSTALATION
16-languages EZMax Setup Wizard
MEMORY
2 MB NOR Flash
8 MB SDRAM
SECURITY
NAT/NAPT IP Sharing
DHCP Server/Client
DMZ
SPI Anti-Dos Firewall
TEMPERATURE
0~45 Degree Celsius
HUMIDITY
10-90% (Non-condensing)
FUNCTIONS
GMP Snooping
DDNS and SNMP
Virtual Server
Supports ACL, MAC/IP/Application Filter and URL Blocking
UPnP
VPN Pass Through (IPSec/PPTP)
DIMENSION
196 x 109 x 30 mm
CERTIFICATIONS
CE, FCC


Source: edimax.com

EDIMAX AR-7084A Quick Start Installation Guide

If you lost your Resource CD with Setup Wizard, you can still configure the EDIMAX AR-7084A Fast Ethernet ADSL modem router with this procedures.

To be able to follow this Quick Start Installation Tutorial the PC host must be configured first to obtain the IP Address from the EDIMAX AR-7084A device. Click here to see on how-to Do-It-Yourself.

After obtaining the PC host IP Address from EDIMAX AR-7084A ADSL Modem Router, open any web browser to begin the Quick Start Installation Guide.

Enter the router’s default IP address: “192.168.2.1” into your PC’s web browser and press “enter”.


The login window/screen will prompt or appear. Enter the “User Name” and “Password” then click “OK” to login. The default User name is “admin” and the Password is “1234”,


Successfully login to the EDIMAX AR-7084A Fast Ethernet ADSL Modem Router will appear the main page as you can see below picture. Please click “Quick Start” to begin the setup of the Internet connection.

Step 1. In the Quick Start menu, click “Run Wizard” to start the configuration.

Please follow the four steps in the setup wizard. Begin by clicking “Next”.

Step 2. Please enter the router’s new password and confirm the new password again.
If you wish to keep the router’s default password, enter ‘1234’ and confirm ‘1234’.Click “Next”.

Step 3. Please select the time zone where you are located. Click “Next”.

Please select your ISP’s Connection Type .
For Streamyx DSL Broadband Internet Connection please choose PPPoE/PPPoA.

Step 4. Input the data supplied by your ISP, that is Log In ID/Username and Password.

If you are not sure about the connection type, please contact your ISP. The TM Streamyx hotline is 100 and for other telco's may dial 1300-888-123 wrong connection type will prevent you from connecting to the Internet.

The following is an example to setup Dynamic IP Address with VPI, VCI and Connection Type as follows:

Step 5. Click “Next” to save the settings and please wait for the router to restart.

Quick Start Completed, please click “Close” when changes have been saved successfully and the Internet will be connected.


Click here to see the Internet Connection Status.

EDIMAX AR-7084A Interface Setup, Internet

Interface Setup

Internet


ATM VC

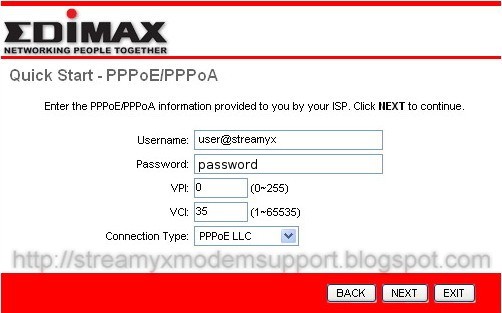
Virtual Circuit / VPI (Virtual Path Identifier) and VCI (Virtual Channel Identifier define a virtual circuit.

VPI - is a virtual path determines the way an ATM cell should be routed. The VPI is an 8-bit (in UNI) or 12-bit (in NNI) number that is included in the header of an ATM cell. The valid range for the VPI is 0 to 255. Enter the VPI assigned by the ISP.

VCI - VCI is the label given to an ATM VC to identify it and determine its destination. The VCI is a 16-bit number that is included in the header of an ATM cell. The valid range for the VCI is 32 to 65535. Enter the VCI assigned by the ISP.

ATM QoS
CBR (Constant Bit Rate) – This class is used for emulating circuit switching. The cell rate is constant with time. Select CBR to specify fixed (always on) bandwidth for voice or data traffic.

UBR (Unspecified Bit Rate) – Select UBR for applications that are non-time sensitive, such as e-mail.

rtVBR (real time Variable Bit Rate) – This class is similar to nrtVBR but is designed for applications that are sensitive to cell-delay variation. Examples for real-time VBR are voice with speech activity detection (SAD) and interactive compressed video.

nrtVBR (non-real time Variable Bit Rate) – This class allows users to send traffic at a rate that varies with time depending on the availability of user information. Statistical multiplexing is provided to make optimum use of network resources. Multimedia e-mail is an example of
nrtVBR.

PCR
Divide the DSL line rate (bps) by 424 (the size of an ATM cell) to find the PCR (Peak Cell Rate). This is the maximum rate at which the sender can send cells.

SCR
SCR (Sustain Cell Rate) is the average rate, as measured over a long interval, in the order of the connection lifetime.

MBS
MBS (Maximum Burst Size) refers to the maximum number of cells that can be sent at the peak rate. Type the MBS, which is less than 65535.

Encapsulation

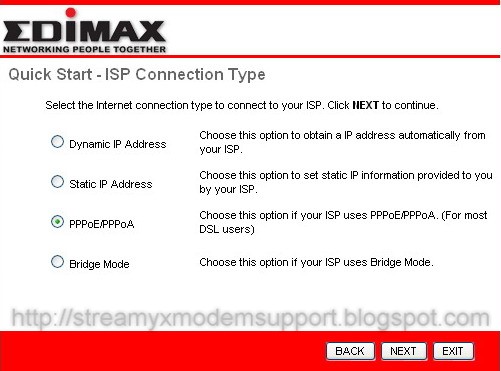
The router can be connected to your service provider in any of the following ways.

Dynamic IP Address - Obtain an IP address automatically from your service provider.

Static IP Address - Uses a static IP address. Your service provider gives a static IP address to access Internet services.

PPPoE/PPPoA - PPPoE (PPP over Ethernet) and PPPoA (PPP over ATM) are common connection methods used for xDSL.

Bridge Mode - Bridge Mode is a common connection method used for xDSL modem.

Dynamic IP Address/Static IP Address/PPPoE/PPPoA/Bridge Mode

After you have selected the ISP Type, this web page will be varied depending on the ISP Type you select. You have to continue setting some parameters. Please refer to the following table for the explanation of each parameter.
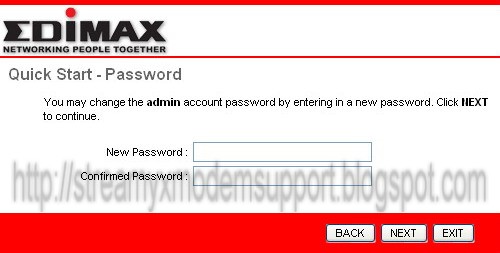
User Name - Enter the username exactly as your ISP assigned.

Password - Enter the password that your ISP has assigned to you.

Encapsulation - Please check with your ISP the method of multiplexing. In Bridge Mode, please select “1483 Bridge IP LLC” or “1483 Bridge IP VC-Mux”. In PPPoE/PPPoA mode, please select “PPPoE LLC”, “PPPoE VC-Mux”, “PPPoA LLC”, or “PPPoA VC-Mux”.

Bridge Interface - This router built-in ADSL modem is able to connect to ISP automatically.

Alternatively, if you want to use the dial up software to manually connect to the ISP, you have to activate the ”Bridge Interface”.

Connection Always On – The connection will be kept always on. If the connection is interrupted, the router will re-connect automatically.

Connect On-Demand – Only connect when you want to surf the Internet. “Close if idle for xx minutes” is set to stop the connection when the network traffic is not sending or receiving after an idle time.

Connect Manually – After you have selected this option, please go to Status page. You will see the “Connect” button, click it and the router will connect to the ISP. If you want to stop the connection, please click “Disconnect” button.

TCP MSS Option - The “TCP MSS Option” enables the configuration of the maximum segment size (MSS) for transient packets that traverse a router, specifically TCP segments in the SYN
bit set, when PPPoE is being used in the network. Please specify the MSS range from 100 to 1452 bytes or 0 byte as the default value.

Get IP Address - Choose Static or Dynamic IP Address. If Static IP is selected, please set the IP Address, Subnet Mask and Gateway obtained from your ISP.

Static IP Address - Enter the IP Address assigned by your ISP.

IP Subnet Mask - Enter the Subnet Mask assigned by your ISP.

Gateway - Enter the Gateway assigned by your ISP.

NAT - NAT (Network Address Translation), an Internet standard that enables a local-area network (LAN) to use one set of IP addresses for internal traffic and a second set of addresses for external traffic. When NAT is enabled, the router will help to make all necessary IP address translations for the PC connected to the router to access the Internet.

Default Route - When “Default Router” is enabled, all the packets for destinations not known by the router's routing table are sent to the default route. By default, it is enabled.

TCP MTU Option - MTU (Maximum Transmission Unit) determine the maximum size of each packet in any transmission within the network. Please specify the MTU range from 100 to
1500 bytes or 0 byte as the default value.

Dynamic Route Dynamic routing allows routing tables in routers to change as the possible routes change. This router supports RIP1, RIP2-B and RIP2-M protocols for dynamic routing. After the RIP protocol is selected, please choose the RIP direction from “None”, “Both”, “IN
Only” or “OUT Only”.

Multicast - Specify the method of transmitting data simultaneously to many receivers. Please select “IGMP v1” or “IGMP v2” as the multicast protocol or select “Disabled” to disable
the function.
Related Posts Plugin for WordPress, Blogger...